Showing posts with label spices. Show all posts

Saturday, April 30, 2011

Rasam Powder

Rasam, a lovely blend of spices, tamarind and lentils is a favorite in southern India. Usually mixed with rice, rasam also makes a great soup. I've posted the recipe for my favorite rasam earlier, and a simple rasam as well. This is the basic spice mix used to make rasam.


Rasam Powder

1 cup Coriander Seeds
1 cup Toor Dal
1/4 cup Black Peppercorn
1/4 cup Cumin Seeds
15-20 Dried Red Chillies
1 cup Curry Leaves

Roast the coriander seeds, toor dal, peppercorn, cumin seeds and red chillies.

Separately roast the curry leaves.

Grind together to reach the consistency of semolina (a coarse grain).

This powder can be stored in an airtight container for up to 6 months.

Friday, June 26, 2009

Gingerbread Cookies

My nephew came over yesterday all excited to make gingerbread cookies. He had his own recipe from a book, but that required a 2 hour wait for the dough in the refrigerator. I quickly checked online to find an easier recipe.

And came across one of the most lovely blogs I have seen. Exclusively Food, a blog by Amanda and Debbie, has great recipes and beautiful photographs. Their gingerbread people are incredibly cute, and thankfully my nephew loved them too.

So armed with their recipe, I had 3 kids making gingerbread cookies. They came out absolutely delicious! We didn't quite get to make people as I don't have great cookie cutters, but we made several different shapes. Our artistic talents were also slightly lacking. And most of the cookies were eaten before we could even get to the icing stage!


Gingerbread Cookies
(adapted from Exclusively Food)

2 1/2 cups All-Purpose Flour
140 g Butter, softened
1/2 cup Brown Sugar
1 large Egg, divided into yolk and white
1 tsp Cinnamon Powder
1 tsp Nutmeg Powder
3 tsp Ginger (I used ginger paste)
1 tsp Baking Soda
1/2 cup Golden Syrup

Stir together in a bowl, the flour, baking soda and spices.

In another large bowl, cream the butter and brown sugar together. Add the egg yolk and golden syrup and beat together until combined. Slowly add in the flour mixture until just combined.

Preheat oven to 180 deg C. And line a baking sheet with baking paper.

Divide the dough into halves. Roll out one half between two sheets of baking paper or parchment paper. Transfer to the freezer. Repeat for the other half. Let the dough freeze for about 15-20 minutes. This is essential - its really difficult to work with the soft dough before freezing.

Remove from the freezer and cut desired shapes. Transfer to the baking sheet carefully and bake for 10 minutes until firm. Let cool for 5 minutes and transfer to a wire rack.


While the cookies are baking, whisk together the icing:

Icing

1 1/3 cup Icing Sugar
1 Egg White (the one you saved from the yolk above)

Combine very well until a pale white. Add food coloring if you'd like. Decorate the cookies (I used Ziploc bags with a tiny bit of the edge cut off to pipe the icing onto the cookies) after they have cooled a bit from the oven. And let the icing set completely (of course, we didn't wait at all!).

They were fantastic. Thanks so much for a keeper recipe!!

Thursday, May 21, 2009

Christopsomos

As the second bread in our Bread Bakers Apprentice Challenge, we were to tackle a Greek Celebration Bread, Artos. There are several variations of the basic bread. One of them is Christopsomos, a beautiful, decorative bread full of lovely flavors! For the recipe, please see Google Books.


We start with a poolish of water, flour and yeast. Allow it to rest overnight for a few hours at room temperature and then in the refrigerator. It will be all lovely and bubbly the next day.


Then add the rest of the flour, butter and lovely spices (cinnamon, nutmeg, allspice and cloves), yeast, oil, honey and eggs. I left out the allspice because I couldn't find them in the store, and instead increased the quantity of cinnamon (because I just love cinnamon!).

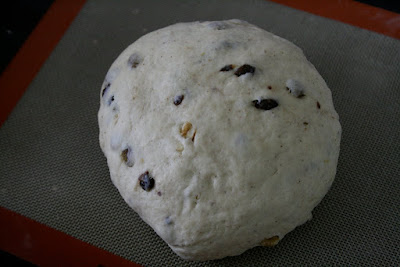
This is the basic Artos bread. To make the variation, add dried fruit (cranberries/dates/figs/cherries), walnuts and raisins. I used dried chopped dates, walnuts and golden raisins. Be sure to include these in the final stages of kneading the dough before the bulk fermentation.


Allow the dough to double in size (about 90 minutes).


After the bulk ferment, divide the dough into 1/3rds and 2/3 rds. Wrap up the smaller portion and put it away in the refrigerator. The larger portion is shaped into a boule, then lightly oiled and allowed to proof at room temperature for about an hour.


When you are ready to bake the bread, take out the smaller piece and divide into half. Roll each half into a rope. Cross the ropes on top of the boule and let the ends hang down. Split each end and roll up to form a fun decorative pattern. If you're having trouble making the ends stick to the boule, apply a little bit of water.


Bake at 350 deg F for 20 minutes, then rotate the pan for even baking, and bake another 20-25 minutes. While the bread is baking, make a glaze of water, sugar, honey and lemon extract (I left this out because I didn't have it).

Brush the glaze onto the bread after you take it out of the oven and sprinkle generously with sesame seeds.

The bread was absolutely delicious. I made it on Mother's Day and my mother loved it. The crumb is soft and filled with the deliciousness of raisins, walnuts and dates.


The crust is sweet and sticky with the glaze and the sesame seeds.


I'll definitely be making this bread again!

Thursday, November 6, 2008

Cabbage

My dear friend, Sunshinemom, is hosting a wonderful event called Food in Colors, and this month's theme is - purple and black! Those aren't common colors in the food universe - okay, maybe purple but definitely not black. But I did find the perfect colors in cabbage and whole urad dal (also known as black gram or black lentil).

We use the beautiful purple cabbage quite a lot in my house. The crunch of the cabbage with the tempered spices is delicious. And the color really takes your breath away.


Here are some cool facts about purple cabbage that I didn't know:

1. The purple color comes from the presence of a phytochemical which acts as an antioxidant, and is said to improve one's memory. This phytochemical is what gives the purple color.

2. Purple cabbage is not as healthy as green cabbage, and should be eaten in moderation!

Now onto the recipe:

Purple Cabbage

1 head Purple Cabbage, cut into thin strips
Salt, to taste
2-3 tbsp Water

Tempering:
1 tsp mustard seeds
1 tsp whole urad dal
3-4 curry leaves

Heat a saucepan over medium heat. When the pan is hot, add the cabbage, salt and water and toss around a couple of times. Now close the pan and leave it alone for about 5-7 minutes. The salt tends to sweat the cabbage and you'll find this is more than enough water for it to cook.

We like the cabbage really crunchy at home, so I take it off the heat at this point, but if you like it softer, you can add more water or leave it on the stove for a bit longer.

For tempering - heat a skillet with a few teaspoons of oil. When hot, add the mustard seeds, urad dal and curry leaves. When the mustard seeds begin to pop, remove from heat and add the tempering ingredients to the cooked cabbage.

Serve hot as a side to rice or rotis or as a warm salad.


To know what my marathoners are doing, check out their lovely blogs:
DK, Siri, Srivalli, Ranji, PJ, Curry Leaf, Medha, Priya, Bhawna, Raaji, Ruchii, Kamala, Roopa, Divya Kudua, Rekha, Divya, Lakshmi, Raaga, Lakshmi, Sripriya, Viji, Kamalika and Pavani.