The banana tree is extremely versatile and most parts of it are used in Indian cooking in one way or the other. The leaves are used as plates to eat on, and of course the fruit is one of the most favorite parts of the plant. Banana Blossoms are used frequently in south Indian food - especially in Kerala. It takes a little bit of prep - but the result is a wonderful, mild dish which is also extremely healthy.
Spicy Banana Blossoms
1 Banana Blossom, peeled and chopped
1 cup or more Yogurt, mixed with 1 cup water and salt, to taste
2-3 tbsp Coconut, grated
1 large Onion, chopped fine
For tempering:
1 tsp Mustard Seeds
1 tsp Urad Dal
2-3 Green chillies, chopped
2-3 Curry Leaves
Here's the lovely banana blossom.
Peel off the lovely red petals, and you'll find a bunch of tiny yellow and white flowers. Each petal houses several of these flowers. Put the flowers in a bowl as you peel off the petals. As you go deeper into the blossom, you'll find smaller flowers that are white and tender. Save all the flowers.
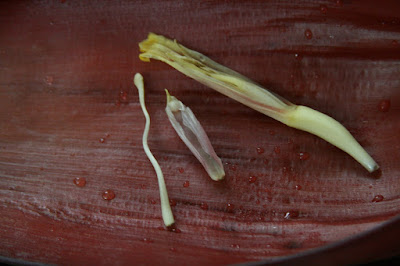
Each flower consists of 4 parts - one long outer cover, one short outer cover, one white hard thread with a tiny head and lots of little thread-like sheaths. Remove the long outer cover and the hard thread, as shown here. Repeat for all the flowers. You can read more about this here.
Chop up the remaining bits.
Soak the chopped bits in the yogurt mixture for atleast 15-20 minutes. This gets rid of any bitterness that the flowers might have.
Heat a saucepan with the oil. Throw in the mustard seeds, urad dal, onions, curry leaves and green chillies. Saute until the onions are browned.
Drain most of the yogurt from the soaking flowers (don't drain it completely - the yogurt adds a nice flavor to the dish). Add handfuls of the flowers at a time to the cooking onions. Continue to stir fry. When you've added all the flowers, add a couple of tablespoons of water and cover and let cook for about twenty minutes. Check on it a couple of times and drizzle with water if it appears too dry.
When cooked and soft, sprinkle with the grated coconut. Serve warm with rice or rotis.
This is off to Rachna @ Soul Food for this month's JFI - Flower Power. JFI was originally started by Indira of Mahanandi.
Monday, July 28, 2008
Sunday, July 6, 2008
Zebras and Leopards
I've been wanting to try making a Zebra Cake for the longest time. And then I tried it. And then I tried it again. And then again. And again. FOUR times!! Each time, something went wrong - when I fixed that, something else went wrong. And I now know the entire recipe in my head!
Here's my final attempt - and I thought it was pretty good. It's still not perfect - but the reason baffles me.
Zebra Cake
(I followed this recipe exactly)
Here you have the ingredients: Sugar, All-purpose Flour, Milk, Cocoa, Baking Powder, Oil and Eggs.
First beat the sugar and eggs together. Add the milk and oil and continue to blend well. Meanwhile, sift the flour and baking powder. Start adding the flour to the wet ingredients, little by little, until well combined. Do not over beat, and don't let those bubbles form as far as possible. Of course, since I was using a hand whip, the bubbles did form! Divide the dough into halves and add cocoa to one half.
Now comes the important part. In a buttered baking dish (I think you should use a round pan, though I tried both a round and a rectangular and didn't see much difference). First scoop about 3 tbsp or 1 ladle that holds about 3 tbsp of batter in the middle of the pan. Then pour the dark batter in the middle of the original batter. Here you go:
It will look like this when you're done:
Now bake for 40 mts at 180 deg C. And try not to peek, please!
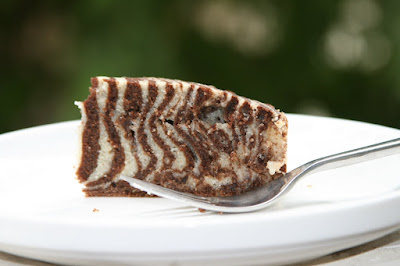
When you cut it, you can see the beautiful stripes! Its really a gorgeous cake. Do you see the holes in mine? That's what happens if you have bubbles! It's still light and moist and delicious, though.
Leopard Cupcakes
Okay, now that we're done with the Zebra, let's move onto the Leopard, shall we? It's just that I had some batter left over from the above process. So I poured two ladlefuls into a muffin tin and baked it (one ladle of the regular batter and one of the cocoa). We got ourselves some spots.
Aren't the felines lovely? :)
My daughter was delighted with her "zoo" dessert! And now that we have stripey zebras and spotted leopards, she requests a giraffe next!
Friday, July 4, 2008
Simple Fried Rice
When my dear friend, DK, announced that China was the destination for this month's AWED, I really didn't know what I could contribute. I've tried very hard to replicate Chinese flavors at home, without much success - it always seems to require ingredients that I end up substituting, and then it just never tastes the same.
I love spicy food, but when it comes to Chinese, I'm not a huge Indian Chinese person. I much prefer stir fried Bok Choy and Greens to Cauliflower Manchurian. This is one of the staples we used to make - a very simple fried rice, which was always well appreciated.
Simple Fried Rice
1.5 cups cooked long grain Rice (chilled overnight in the refrigerator (leftovers are perfect) - the rice needs to be cold. I used Basmati)
3/4 cup or more Bean Sprouts
2-3 cloves Garlic, chopped
2 tsp Soy Sauce
2-3 Spring Onions (white and green parts chopped separately)
1/2 cup Mushrooms (I used button, but shiitake are preferable)
1 Egg, beaten with a tsp of water
Heat a tsp of sesame oil in a pan. When hot add the garlic, white parts of the spring onions, mushrooms and soy sauce. Stir fry until mushrooms are cooked. Remove from heat and keep aside.
Add the egg to the pan and swirl around to form a very thin layer. Let it set (about a minute), then gently slide off the pan and roll into a cigar shape. Cut cross-wise to form the restaurant-style strips.
Now add the cold rice to the pan, saute for a minute and then add the mushroom mixture. Toss with the rice for about 2 minutes until combined. Add the egg and toss through. I like to add some more bean sprouts at this point to add some crunchiness, but its completely optional. Now add the chopped green parts of the spring onion.
Serve with stir-fried greens.
This rice can obviously be made very personal by adding or subtracting any of the veggies. It tastes great with peas, carrots as well. Feel free to leave out the mushrooms or eggs if you don't enjoy them. This is a very basic recipe that can be easily customized for your taste.
Wednesday, July 2, 2008
Yogurt Cake with Berries
I've had this recipe bookmarked for a very long time. When I was doing a bit of "spring cleaning" yesterday, I found this and almost sprinted to the kitchen, wondering why I hadn't bothered to make it all this while. Its one recipe where you will almost definitely have all the ingredients on hand and it promised to be delicious.
Yogurt Cake with Berries
(original recipe from here)
2 eggs
1 cup plain yogurt
1 cup sugar
1/3 cup oil
2 cups all-purpose flour
1 1/2 tsp baking powder
1/2 tsp baking soda
1 tsp vanilla essence
a handful of mixed berries
Preheat oven to 180 deg. C.
Combine yogurt, eggs, sugar, vanilla and oil in a bowl until completely mixed.
Sift the flour, baking powder and baking soda together.
Fold the dry ingredients into the wet ingredients gradually until well combined. Sprinkle the berries on top - they will gradually sink into the cake as it bakes.
Pour into a round tin and bake for about 30-35 minutes, or until a toothpick inserted in the center comes out clean.
Absolutely perfect, soft and delicious.
This is also off to dear Siri for her Yogurt event - can't wait for the round-up!
Tuesday, July 1, 2008
Doubly Delicious Chocolate Chip Cookies
Another lovely challenge from the Sweet and Simple Bakes team, Ultimate Double Chocolate Cookies. This was my first time baking cookies (yes! I'm a complete novice baker!), and this was just the thing to get me going in the cookie category.
I must first congratulate the S+SB team, Rosie and Maria, who are doing a fabulous job. I've gained a lot of confidence just from their fail-safe recipes and directions. Not to mention that my family thanks them too! (the 2 dozen cookies where gone in 2 hours, by 4 people! Crazy!).
The rule of thumb at home seems to be that the height of the cookies has to be equal to the height of the glass of milk! Nice, huh?
And this is my entry for Click: Cookies. I can't wait to see all the photos!
Ultimate Double Chocolate Cookies
(the recipe from here)
9 oz All-Purpose Flour
2 oz Cocoa Powder
1/2 tsp Baking Soda
6 oz Butter at room temperature
7 oz Demerara Sugar
4 oz Caster Sugar
1 1/2 tsp Vanilla essence
2 Eggs, lightly beaten
11 oz Chocolate Chips
Sift the flour, baking soda and cocoa together into a bowl.
In another bowl, add the butter and both sugars and mix well until creamy. Add the eggs (a little bit at a time), until well combined and then the vanilla. Beat until smooth and fully mixed in.
Add the flour mixture, a little bit at a time, and fold into the wet ingredients. Now add the chocolate chips until combined. Cover the bowl with cling wrap and set aside in the refrigerator for at least an hour, until chilled and firm.
Preheat oven to 180 deg C.
Roll the mixture into little balls (about the size of a ping pong ball) and place them on a greased baking sheet, leaving enough room for the cookies to expand while baking. Flatten slightly with your fingers.
Bake for approximately 10 minutes. They came out perfect! Let it cool for a few minutes on the baking tray and then transfer to a cooling rack until they are completely cool.
They were ... all gone in 2 hours!
Can't wait for next month and the next challenge! And here are some fun/ interesting cookie recipes - check them out!
Is this an average cookie? Nope, its a Mean Chocolate Chip Cookie!
Cookies Baked in a Car!
Subscribe to:
Posts (Atom)