Friday, October 24, 2008

Challah

After seeing this recipe from the Bread Baking Babes for Challah, a traditional Jewish celebratory bread, I absolutely had to try it. It looked complicated but I realized the end result was sure to impress. And I was right - about the impressive part! But it really was very easy to make. For the directions, please see the recipe on I Like To Cook. She has impressive step-by-step photos too.


Challah
(from the New York Times Bread and Soup Cookbook)

5 1/2 - 6 1/2 cups Flour, unsifted
3 tbsp Sugar
1 1/2 tsp Salt
1 package dry active Yeast
1/2 cup Butter or margarine, softened
pinch powdered Saffron
1 cup warm Water (120-130'F)
4 Eggs, at room temperature

1 tsp cold Water
1/2 tsp Poppy seeds

Stir the saffron into the warm water and stir until it dissolves.

Combine 1 1/4 cups of flour, the sugar, salt and yeast in a large bowl. Mix in the softened butter. Add a little at a time to the flour mixture and blend thoroughly. Beat for 2 minutes with an electric mixer and medium speed, scraping the bowl occasionally.

Separate the yolk and white of one egg. Blend the single egg white and the other 3 whole eggs into the batter. Reserve the single egg yolk. Stir 1/2 cup of flour into the batter and beat at high speed for 2 minutes, scraping the bowl occasionally. Blend in enough additional flour to make a soft dough. Knead the dough on a lightly floured board about 8 to 10 minutes or until it is smooth and elastic.

Place the dough in a greased bowl, turning it once to grease the top. Cover and allow the dough to rise in a warm, draft free place until double in bulk (approximately one hour).

Turn the dough out onto a lightly floured surface. Divide the dough into two equal halves. Divide each portion into 2 pieces, using 1/3 of the dough for one piece, and 2/3 of the dough for the other. Divide the large piece into 3 equal portions.

Roll each of these into 12 inch ropes. Braid the ropes together tightly, using your fingers to press the dough together at the ends. Divide the smaller piece into 3 equal portions. Roll each of these into 10 inch ropes and braid tightly. Place the smaller braid on top of the larger one and seal the ends. Repeat this process to form the second loaf. The dough was smooth and elastic and really easy to braid - I was sure this was going to be the tough part but it was actually fun to do.


Place both braided loaves on a greased baking sheet. Mix the reserved single egg yolk with the 1 tsp of cold water and brush the top of the loaves with the mixture. Sprinkle with poppy seeds (I left this out), and let the loaves rise until double in bulk in a warm draft free place (approximately one hour). Bake in a 400' over for 20 to 25 minutes. Remove from the oven and let cool on wire racks.

(yeah one of them got a little lopsided!)

Wednesday, October 22, 2008

Pani Puri

Pani Puri is a favorite street food in India. In lots of "chaat" stalls around the cities, you can see people standing around carts popping little pieces of deliciousness into their mouths! This is my absolute favorite Indian snack (well...um... okay One of the many!).

It consists of 3-4 components - a deep fried puri, a sweet chutney, a spicy chutney and a stuffing for the puri. You first make a little hole in the puri, add a teaspoon of the stuffing, add a spoonful of each stuffing and pop it in your mouth before everything starts falling out! Its fun to eat!


Pani Puri
(recipe from Bhavani @ Snap Eat Burp)

Sweet Chutney

100 g Dates, boiled
1 marble-sized ball of Tamarind
1 tsp Chilli Powder
1 pinch Black Pepper
1 pinch Salt

Grind all ingredients together in a food process and keep aside.

Spicy Chutney

1 cup Cilantro Leaves
1/2 cup Mint Leaves
5 Green Chillies, coarsely chopped
4 cups Water
2 Cloves
1 small Cinnamon Stick
2 Cardamom
1 tsp Cumin Powder
3 tbsp Jal Jeera Powder (available in most Indian grocery stores)

Grind the cilantro, mint and green chillies together with the water and salt.
Roast the cloves, cinnamon, cardamom and cumin on a medium heat in a saucepan. Grind to a fine powder.
Mix the roasted and ground spices and the jal jeera powder with the ground cilantro mixture.

Stuffing for the Puri

1/2 cup Green Moong Dal/ Green Lentils, soaked in water until tender
1/2 cup Garbanzo Beans/ Kabuli Channa, soaked in water and then boiled
5 small Potatoes, peeled and boiled
3 tbsp Channa Masala (available in all Indian grocery stores)

Combine all ingredients together with a little salt to taste.

Puris

2 packets Puris (available in some Indian grocery stores)

OR

you could make your own puris. Priya @ Food for Bliss has a lovely recipe for making your own puris at home. She has some great photos of the pani puri too!

To Eat:

Crush the top of the puri a bit. Stuff the puris with the veggie stuffing, add a little bit of the sweet chutney, dip into the spicy chutney and eat in one bite. Enjoy!

Monday, October 13, 2008

Parisian Baguettes

I have baked about a half dozen different kind of breads in the past few months and I have been really enjoying it. Bread baking is almost therapeutic and the kneading is the best part. If you don't feel that way, bread baking will become a chore and not a delight. To be able to get out a loaf of delicious bread from a few ingredients is a wonder - not to mention the smell of fresh baked bread that envelopes the house.

The two breads that I find myself shying away from are baguettes and bagels. Having had very good quality breads of both kinds, I know that I will constantly compare mine to those, and didn't want to attempt it. Until I came across a 
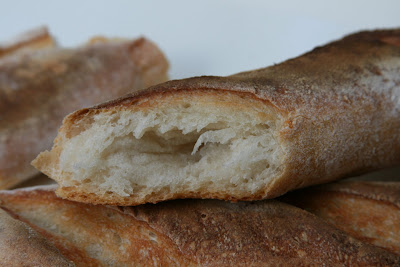
baguette recipe at a Year in Bread. Susan has written the instructions so clearly and precisely, that I found myself wondering whether I could attempt it. I did try it and it was every bit as wonderful as any Parisian baguette I've had.

If you enjoy baking bread, this is a must-try recipe. Her instructions are very detailed - mine are much more casually written.


Parisian Baguettes
(adapted from A Year in Bread)

1 1/2 cups Water
1 tsp Instant Yeast
3 1/4 cups Flour (I used all-purpose)
1 1/2 tsp Sea Salt (I used regular salt)
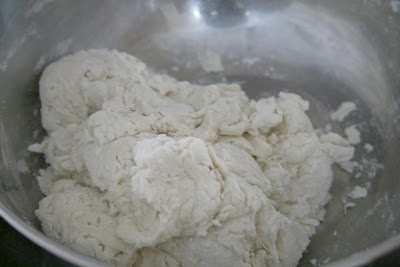
Initial Resting:
Combine all the ingredients together with a spatula in a large bowl. They will come together as a big dry clumpy dough. Cover with a muslin cloth and allow to rest for 20 minutes. This is great for the yeast to start doing it's thing.


Kneading:
Empty the contents onto a lightly floured surface and begin to knead the dough, adding as little extra flour as possible. If it feels sticky, just dust your hands or the surface with flour and continue kneading. Knead for 10-12 minutes until the dough starts feeling smooth and soft. It took about 10 minutes for me to get to this point.
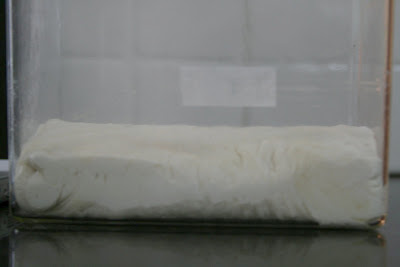
First Proof:
Transfer the dough to a clear plastic, oiled container. Mark a spot on the container which will indicate how much it should rise to be 1.5 times its size. Cover the container with a muslin cloth and leave in a warm place (about 70-75 degrees F).


Giving it a turn:
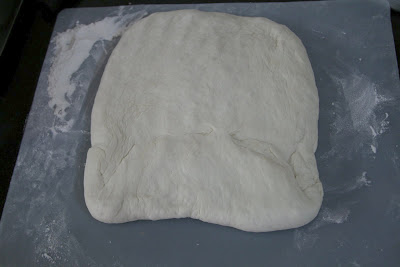
When the dough reaches the 1.5 times mark, empty the dough out onto a lightly floured surface. Press the dough out gently (you don't want those wonderful air bubbles to completely go away), into a rough rectangle with the short end facing you.


Fold the top edge halfway down to the middle. Now fold the bottom edge halfway up so the bottom edge slightly overlaps the top edge. Slide your hands under the dough and flip it over so the folds are underneath. Slip the dough back into the oiled container and cover again with muslin. Let it rise half-way to the previous mark (about 25% or approximately 45 minutes).

Oven Preheat:
I preheated the oven to 235 deg C (or 450 deg F) after the 45 minutes (this is about an hour before you start baking - if your oven heats up faster, you could wait and switch it on later - but it needs to be really hot when you are ready to bake). If you have a baking stone and cast iron skillet, allow both to warm up with the oven. I don't have a baking stone, so didn't use one. I also don't have a cast iron skillet, so didn't do that either.

Pre-shaping:
Empty the dough onto a lightly floured surface. Divide it into 3 equal parts (I just eye-balled this, but you could weigh it to make sure its equal).


Press the dough gently into a rectangle. Fold it length-wise.


Repeat for the other 2 pieces. Cover with a muslin cloth and let it rest for 10 minutes. This is just to relax the bread, which will make it easier to shape.

Shaping:
I used Susan's instructions plus this video for shaping a baguette. Its pretty simple, but I'm sure it comes with practice - I followed instructions to the T. I've tried to break it down here:

1. First pat the first portion of dough into a rough rectangle (about 3" by 5"), with the long side facing you.

2. Bring the top edge down to the center. Press gently to seal. Bring the bottom edge up to the center mark and press again to seal. Now you have a seal down the center. Now fold the entire skinny rectangle in half length-wise. With the heel of your palm (I used my finger tips) seal the dough gently leaving the edges rounded.


3. Stretch the log by using a gently rolling motion with the palms of your hands. Start at the center and simultaneously roll and stretch the log as your palms get to the end. I got it to about 13", which is as long as my oven would hold.

4. Repeat for the other two pieces of dough.

The Couche:
Use a large piece of canvas or heavy smooth fabric (I used a heavy towel that was not terry cloth (you don't want anything that's fuzzy). Dust the cloth heavily with flour. Lay the formed baguettes about 2" apart on the cloth.


Pinch the cloth between the baguettes to bring them up and form a sort of wall between the baguettes. This is to ensure that they hold their shape.

Second Proof:
Sprinkle the baguettes with flour and cover with a muslin cloth. Leave to rise for 30 minutes.
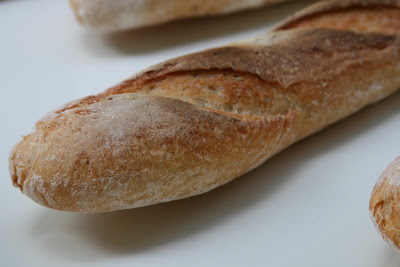
Scoring:
Remove the muslin, and straighten out the heavy fabric. Use a blade or a sharp serrated knife to make diagonal cuts on the surface of the bread. The indentations should be about 1/2" to 3/4" deep (I didn't measure mine - but I made sure it wasn't too deep).


The indentations not only make the bread look pretty when done, but they also help steam to escape while baking. As Susan says "slash quickly and confidently".

Baking:
I transferred the baguettes onto a baking sheet and slipped the sheet into the oven. Also put a tray filled with 1/2 cup of ice at the bottom rack of the oven to create steam. Bake for about 20-25 minutes (mine took 25 minutes). Take them out when they are golden.

Cooling:
Remove from oven and let it cool for about 5 minutes. They are best eaten warm. We finished 2 1/2 baguettes between 5 of us within a matter of hours. If keeping it for the next day, they need to be toasted before eating.


Phew - I know it's long - but when you have fresh homemade baguettes at the end, hey, there's nothing more satisfying!


This is off to dear DK at Culinary Bazaar for AWED: France.

Saturday, October 11, 2008

Mulligatawny Soup

Mulligatawny in Tamil means Pepper Water (Milagu + Thanni). When the British came to rule India, they enjoyed the local rasam very much and decided to tweak it a bit to make it suit their palettes, as well as trying to make it an appetizer or entree on its own. The version you see on restaurant menus these days is an anglicized version of rasam or pepper water.

We enjoy it on cool nights when you need just a bowl of hot soup and some bread. Be warned that this is a heavy soup and a bowl can be had as a complete meal.


Mulligatawny Soup

1 tsp Peppercorn
1 Onion, sliced
250 g Moong Dal (split yellow lentils)
1 tsp Turmeric Powder
2 Bay Leaves
2-3 Curry Leaves
1 Apple, skinned and chopped
1/4 cup shredded Coconut
1 Carrot, chopped
1 clove Garlic
small pinch Garam Masala
Salt, to taste (about 1 1/2 tsp)
1 tsp Oil

In a heavy saucepan, cook the lentils with 2-3 cups of water.

In a skillet, saute the onions, carrots, bay leaf, peppercorn, apple, curry leaves and coconut together. Once the carrots are cooked through, add the sauteed ingredients to the cooking lentils. Add the garam masala, turmeric and salt and allow to simmer for 5-7 minutes or until lentils are completely cooked.

Remove from heat. Hunt for and fish out the bay leaf and curry leaves (you don't want those blended in - they make the soup bitter). Put the soup in the blender for a few minutes and strain.

Garnish with lemon juice, chopped fresh cilantro and/or cooked rice.

This is for Lisa at Lisa's Kitchen for October's No Croutons Required featuring Vegetarian Soups.

Thursday, October 9, 2008

Sara's Brownies

A dear friend, Sara, recently had a baby. She had gestational diabetes which meant she couldn't have any sugar for over 8 months, while she was pregnant. When I went to visit her and her beautiful baby, she had baked up a storm of brownies and cakes!


I begged her for her brownie recipe and made it on the weekend. It was ooey, gooey and completely decadent. She couldn't find baking chocolate and had substituted the cocoa and butter mixture.


Sara's Brownies

4 Eggs
A pinch of salt
1 tsp Vanilla Extract
2 cups Caster Sugar
1 cup All-Purpose Flour + 1/4 tsp Baking Powder, sifted together
12 tbsp Cocoa, sifted + 4 tbsp Butter
1/2 cup Butter
100 g Walnuts

Preheat oven to 180 deg C.

Beat the eggs, salt, vanilla together. Add the cocoa and 4 tbsp butter and beat together. Now mix in the rest of the butter and beat well.

Fold in sugar, flour and baking powder and walnuts. Pour the entire thing into a buttered tray and bake for 30-40 minutes or until a skewer inserted in the center comes out clean.

Saturday, October 4, 2008

Whole Wheat Pancakes

I first saw this post on Arundati's blog, Escapades, and I told myself I should make this. I wasn't sure though since any whole wheat pancakes I've attempted (with eggs) have been tough and not-so-nice.

Then I saw it on Divya's blog, Dil Se. It was time to stop procrastinating and make it already. So I made them and they were light and fluffy and lovely. We had them drizzled with maple syrup. This picture is off to Click: June (Stacks).


Whole Wheat Pancakes

1 cup Whole Wheat Flour
1 tbsp Brown Sugar
1/4 tsp Baking Soda
1 cup Buttermilk

The only thing I did different was leaving out the cinnamon and reducing the sugar from 2 tbsp. Mix the dry ingredients together and then add the buttermilk. Mix until combined and leave covered for 10-15 minutes.

Heat a pan on low heat. If a drop of the dough dances on the pan, its hot enough. Drop about a quarter cup (or less) at a time onto the pan. When little bubbles begin to form on top, flip it over for a minute until browned. I made tiny dollar pancakes.

Thanks, Arundati for a fantastic recipe. My faith in whole wheat pancakes is restored!


This is off to dear Sunshinemom for FIC: Brown. Its egg-free just for you!

Wednesday, October 1, 2008

Vanilla Apple Cake

Mmmm... There's nothing much to say when you're eating this cake - its just sooo sooo good that you're not really concerned about what to say about it! Another winner this month from Maria and Rosie of Sweet and Simple Bakes.


Vanilla Apple Cake
(recipe from S+SB)

9 oz (about 2 sticks) unsalted Butter, softened, plus extra for greasing
1 1/3 cups Caster Sugar
4 Eggs, beaten
1 3/4 cups All-Purpose Flour + 1 1/4 tsp Baking Powder
1 tsp Vanilla Extract
3 small Apples, peeled, cored and cut into wedges
2 tbsp Demerara sugar
¼ tsp Cinnamon Powder

Heat the oven to 180C. Butter a cake tin and/or line with parchment paper.

Cream the butter and sugar together. Add the beaten eggs and vanilla and beat together. Slowly add in the flour (be as gentle and quick as possible as the flour tends to weigh down the beautiful lightness of the creamed butter and sugar).

Pour the batter into the prepared cake tin. Top with the apple wedges - sinking them in a little as you place them. Here's where you'll think oh-my-goodness there are too many apple wedges and not enough space, but they'll shrink and you'll be glad you added all the apples!

Sprinkle with the Demerara sugar and the cinnamon. Bake for about an hour or until the top is slightly browned and a skewer inserted in the center comes out clean. Leave to cool on a wire rack.


Serve warm with vanilla ice cream (the vanilla ice cream is not optional!).